Through the Epsilon Smart Ergani application you can create users and restrict their access.
Create User
Initially you will need to create all the users you want in the following way.
Once you have logged in to your Epsilon Smart Ergani subscription, you will select your profile icon in the top right (with your email initials).
(Where “SU”, there will be your email initials)
Then select “My Subscriptions” and on your subscription tab, you will select “View Subscription”.
**The View Subscription button will only be displayed to the owner of the subscription and not any users.
You will then need to complete the invitation of all users for whom you wish to give access to this particular Epsilon Smart Ergani subscription, From the Actions button you will select User Invitation where you will need to enter the new user’s e-mail address.
For the above action select “Actions -> Invite User”
*There is a possibility of 2 free users per subscription
Through this menu you have the option to manage users as you are given the option to enable or disable the ability to log in to each user at any time for the specific subscription (the rights of each user will be set in the next step)
Once you have completed the step of inviting all users, you will go within the Epsilon smart Ergani subscription so that the necessary permissions are given, and the per-user access modification is completed.
Access Restriction
From the application’s main menu, select Settings -> Users
In this menu you can see all users for whom the data sharing invitation has been completed
- The Εmployee role has the ability to view the Dashboard to check next week’s pending tasks, without the ability to view – enter times.
- The user role has the option to edit entry and modify hours based on the configuration accepted by the user in the “Access Restriction” tab
- The administrator role has full access to all employees, application settings and also receives notifications in the advanced version.
To enable access restriction per user you will need to enable the corresponding option in the “Access Restriction” tab
Select “Yes” to enable the ability to restrict employee access.
With “Yes” selected, the branch and the list of employees that the user can manage is enabled.
If you wish to grant access to employees by branch, select the branches and then “Apply” so that the employees belonging to that branch are added to the list.
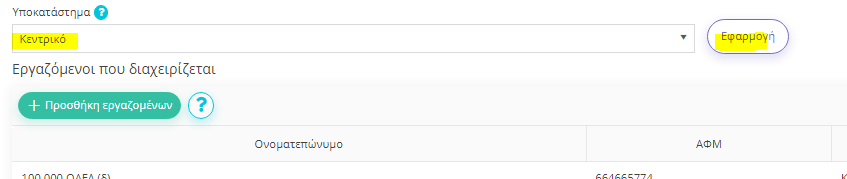
Otherwise Select the “Add employees” button , to add additional employees you want the user to manage, from the available list of employees of all branches.
Use the button, to save any changes.